Quan treballeu amb Matplotlib a Python, l'aparença i la claredat de les vostres visualitzacions juguen un paper crucial per transmetre informació de manera eficaç. Matplotlib proporciona mètodes senzills per canviar la mida de les imatges a matplotlib, ja sigui globalment per a totes les trames o individualment per a visualitzacions específiques, donant als usuaris la flexibilitat per optimitzar les seves parcel·les per a diverses aplicacions i contextos. En aquest article, veurem com canviar la mida de les figures In Matplotlib en Python .
Com utilitzar-lo per traçar?
L'objectiu principal de Matplotlib és crear una figura que representi dades. L'ús de la visualització de dades és explicar històries conservant les dades en una forma més fàcil d'entendre, destacant les tendències i els valors atípics. Podem omplir la figura amb diferents tipus de dades, com ara eixos, un gràfic, una forma geomètrica, etc. Quan tracem gràfics, és possible que vulguem establir la mida d'una figura a una mida determinada. És possible que vulgueu fer que la figura sigui més ampla, més alta, etc.
Augmenta o redueix la mida de la trama a Matplotlib
Això es pot aconseguir mitjançant un atribut de Matplotlib conegut com mida de la figa . L'atribut figsize ens permet especificar l'amplada i l'alçada d'una figura en polzades d'unitat.
Python matplotlib.pyplot figsize Sintaxi
Sintaxi: plt.figure(figsize=(amplada, alçada))
Paràmetres :
prova d'atrapar catch java
width>: l'amplada de la figura en polzades.height>: L'alçada de la figura en polzades.L'atribut figsize és un paràmetre de la funció figure(). És un atribut opcional, per defecte la figura té les dimensions (6.4, 4.8). Aquesta és una gràfica estàndard on l'atribut no s'esmenta a la funció.
Canvia la mida de la figura a Matplotlib
A continuació es mostren els exemples amb els quals podem canviar la mida de la figura a matplotlib:
Exemple 1 : Establiu l'argument de la mida de la figura
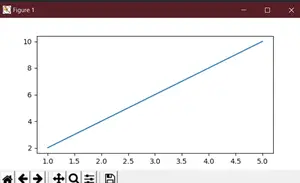
En aquest exemple, es crea una figura Matplotlib amb unes dimensions de 6 polzades d'amplada i 3 polzades d'alçada i s'utilitza per representar l'equació lineal �=2� i =2 x . El gràfic resultant mostra els punts representats d'aquesta equació.
Python 3
# We start by importing matplotlib> import> matplotlib.pyplot as plt> # Plotting a figure of width 6 and height 3> plt_1>=> plt.figure(figsize>=>(>6>,>3>))> # Let's plot the equation y=2*x> x>=> [>1>,>2>,>3>,>4>,>5>]> # y = [2,4,6,8,10]> y>=> [x>*>2> for> x>in> x]> # plt.plot() specifies the arguments for x-axis> # and y-axis to be plotted> plt.plot(x, y)> # To show this figure object, we use the line,> # fig.show()> plt.show()> |
>
>
Sortida:
Això funciona si utilitzeu un IDE de Python que no sigui els quaderns de Júpiter. Si utilitzeu quaderns de Júpiter, no utilitzareu plt.show(). En lloc d'això, especificaries al codi just després d'importar matplotlib, %matplotlib en línia.
bash for loop
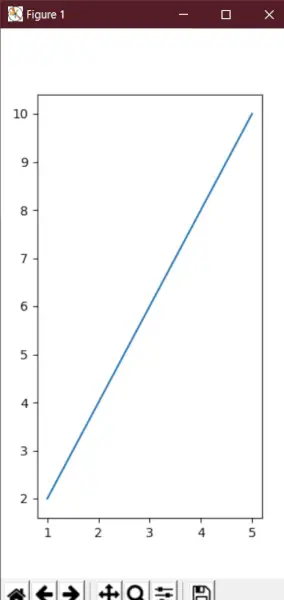
Exemple 2: Canvia la mida de la figura a Matplotlib
Per veure la naturalesa dinàmica de la mida de la figura a Matplotlib, ara hem de crear una figura amb les dimensions invertides. L'alçada serà ara el doble de la mida de l'amplada.
Python 3
# We start by importing matplotlib> import> matplotlib.pyplot as plt> # Plotting a figure of width 3 and height 6> plt_1>=> plt.figure(figsize>=>(>3>,>6>))> # Let's plot the equation y=2*x> x>=> [>1>,>2>,>3>,>4>,>5>]> # y = [2,4,6,8,10]> y>=> [x>*>2> for> x>in> x]> # plt.plot() specifies the arguments for> # x-axis and y-axis to be plotted> plt.plot(x, y)> # To show this figure object, we use the line,> # fig.show()> plt.show()> |
>
>
Sortida:
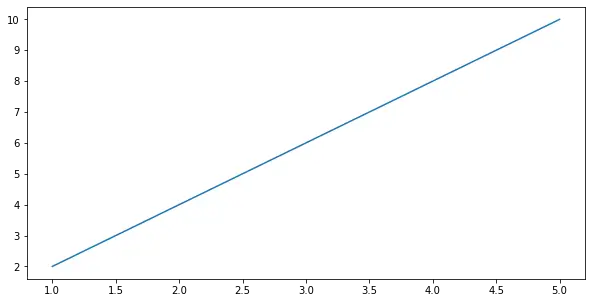
Exemple 3: Estableix l'alçada i l'amplada d'una figura a Matplotlib
En aquest exemple, veurem que en lloc d'utilitzar simplement figsize també podem establir l'alçada i l'amplada de la parcel·la mitjançant set_figheight() i set_figwidth() funcions.
Python 3
# We start by importing matplotlib> import> matplotlib.pyplot as plt> # Plotting a figure of width 10 and height 5> fig>=> plt.figure()> fig.set_figheight(>5>)> fig.set_figwidth(>10>)> # Let's plot the equation y=2*x> x>=> [>1>,>2>,>3>,>4>,>5>]> # y = [2,4,6,8,10]> y>=> [x>*>2> for> x>in> x]> # plt.plot() specifies the arguments for x-axis> # and y-axis to be plotted> plt.plot(x, y)> # To show this figure object, we use the line,> # fig.show()> plt.show()> |
>
>
Sortida:
Exemple 4: Estableix l'alçada i l'amplada d'una figura en polzades
Aquí, veurem un altre exemple de l'ús de la mida de la figura en polzades set_size_inches .
Python 3
# We start by importing matplotlib> import> matplotlib.pyplot as plt> # Plotting a figure of width 5 and height 5> fig>=> plt.figure()> fig.set_size_inches(>5>,>5>)> # Let's plot the equation y=2*x> x>=> [>1>,>2>,>3>,>4>,>5>]> # y = [2,4,6,8,10]> y>=> [x>*>2> for> x>in> x]> # plt.plot() specifies the arguments for x-axis> # and y-axis to be plotted> plt.plot(x, y)> # To show this figure object, we use the line,> # fig.show()> plt.show()> |
unix vs windows
>
>
Sortida: